Click Home button above to go back to Appalachian Bamboo
Building A Greenhouse
I always try to do things the cheapest way possible. Often this has come back to haunt me but this year I built a greenhouse and it turned out pretty good.
The first step was to excavate the area. We used a backhoe and a farm tractor to prepare the location. Where we live in the mountains there is no such thing as a level spot of land so with any project there is going to be some dirt moving.
We made sure there was a little slope so that rainwater would run off and then laid out the frame. I used treated 2X6’s and formed up a rectangle that was 48’ by 20’. I then put down landscape fabric to help control weeds and spread out a dump truck load of gravel on top of the fabric.
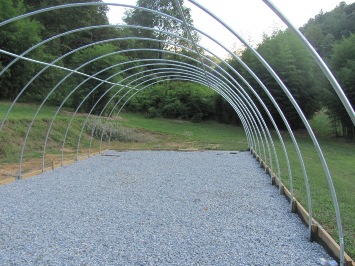
From Ebay I purchased a greenhouse pipe bender for about $40 and bought a bundle of galvanized chain link fence top rails from a local fence installer (they were cheaper than Lowes or Home Depot). The rails were 10’ 6” and it took 3 of them to form one of the arches. The arches ended up being 20’ wide with a center height of 10’ . The ends of the arches rested inside a slightly larger galvanized pipe driven 2-3ft down (on the inside of the treated frame). Once the arches were all standing up I used straight pieces of pipe to brace. These pieces ran the entire length of the greenhouse and I used stainless pipe clamps to attach the brace to each arch. This works better than screwing or bolting them together because it is likely you will need to do some readjusting to get everything square.
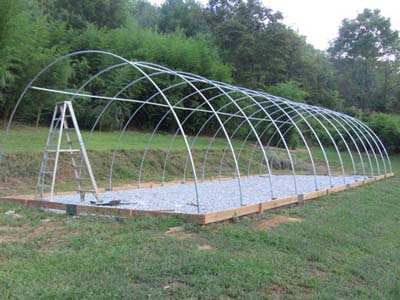
On each end of the greenhouse I used cable braces. They also helped to get everything squared because the amount of pull on each end can be adjusted to ensure the arch is straight before tightening the cable.
Once everything was as level and plumb as I could get it (I never could get everything perfect but you cant tell by looking) I cut some thin strips of lumber using a table saw that I then bolted onto each end arch. These strips are necessary to staple the greenhouse film to later. These strips have to bend with the arch so don’t use something that has knots or that is dry or brittle or it will probably break when you try to bend it.
After the strips were bolted I went ahead and built the end-walls. I used 2- 4X4 treated posts that I cemented into the ground and used as the anchor for the rest of my wall. The end wall is also the frame for your door and vents so keep this in mind when building it. The back end-wall included a frame for my ventilation fan (which I had already picked out).
At this point I could have went ahead and installed the vents, door, fan and then the plastic but since we live in the mountains and do sometimes get quite a bit of snow I decided to add an extra feature to the greenhouse. I took more 4X4 posts and put one down the center of the greenhouse every 12’ . I then nailed a couple of 2X8’s together and set them on the tops of the support posts, butting them right up against the bottom of the arches. This long support brace should help hold up the greenhouse during heavy snowfall.
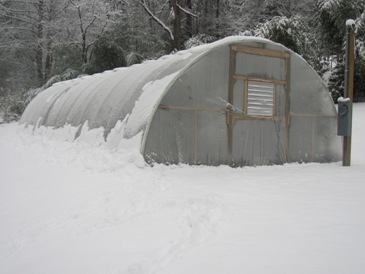
After the door, vents, and fan, the plastic went up (I can tell you that hitting your finger with a hammer stapler is very painful) Then I put in the power pole, box, and did the wiring. I added a couple of electric heaters but only plan to use them when the temperature is below 20degrees. I couldn’t afford to run them all the time in the winter and most bamboo is quite cold tolerant.
The last thing to go in was a table running down the center of the greenhouse and a shade cloth for the top since the temperatures were soaring quickly into the 90’s.
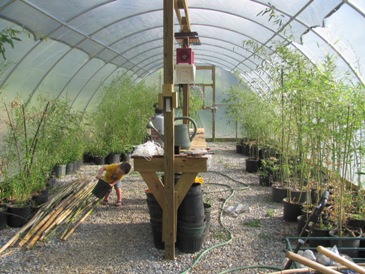
It seemed to take forever but here is the finished product from the inside. Have several plants inside already.